Mint your NFT
Mint a photo from your phone on the free test network. Then accept the offer and find it on Bithomp.
Back to the NFT lesson if you want the ideas first.

Keep birth details off the ledger. Never put a birth date, birth time or birth place in an NFT, its link, or its data. NFTs are public forever. Test XRP has no real value.
Set up Xaman on testnet
You will sign on your phone in Xaman. The app must be on XRPL Testnet, not Mainnet. These are Xaman's official steps. For more detail, see the NFT lesson or Xaman's testnet guide.
Open Xaman. If you do not have it, get it from xaman.app, and use only the official store links on that page.
Go to Settings, then Advanced. Scroll down a little, then turn on Developer mode. Then go back.
Tap the Home button at the bottom. Then tap the network switch at the top right. Select XRPL Testnet under the Testnet category. Check that you are not on Mainnet.
If you see Activate your account, tap it, then tap Activate account. Wait until you see about 100 test XRP. Then tap Close xApp. These coins have no real value.
Need more test XRP? Use the official faucet (optional)
Only if you still need test XRP. Open the official faucet at xrpl.org/resources/dev-tools/xrp-faucets. Choose Testnet. Copy your classic address from Xaman (it starts with r, and it is safe to share). Paste it into Fund wallet, then press Get Test XRP. Never type a seed or secret. Fake faucet links are a common scam.
Pick a photo and name it
Pick a photo from your phone. The page hosts it for you, and the NFT on the ledger stores a link to that picture, not the picture itself. We remove hidden location data before it is hosted. Do not use faces, homes, IDs, or anything that hints at a place.
Remove location from your photo first (recommended)
Photos can hide GPS location in the file. An NFT is public forever, so strip that data first, before you pick or upload the photo.
If you pick a photo on this page, we also strip hidden photo data when it uploads, but removing it yourself is the safest.
iPhone
In the Photos app, open the photo. Tap the More button (the three dots), tap Adjust Info, then Adjust Location, then tap No Location. You can also swipe up on the photo, or tap the info (i) button, then tap Adjust next to the location or map, and choose No Location.
If you are sharing or uploading from the share sheet, tap Options at the top and turn off Location. You should see Location Not Included above Options.
Optional tip: to stop new photos from saving a location, go to Settings, then Privacy & Security, then Location Services, then Camera, and choose Never.
Android
Samsung Gallery: Open the photo, tap More options (the three dots), then Details, then Edit. Tap the red minus sign next to the location, then tap Save. You can also share the photo, then tick Remove Location data before you send it.
Google Photos: Google Photos can only remove a location you added yourself, or one it estimated. It cannot remove a location your camera saved in the file. If you still want to try: open the photo, tap More, tap Edit, then tap Remove location. If you share the photo outside Google Photos, the original camera location can still be in the file.
Optional tip: in your Camera app settings, turn off Location tags (Samsung) or the camera location setting (the name varies by phone). That only affects new photos.
Want to host it yourself? (Pinata)
The NFT on the ledger stores a link to your picture, not the picture itself, so your photo needs a home online first. Pinata is free hosting for that. You can paste the link in the box above instead of picking a photo. These steps use Pinata's documented web app names. Their upload guide is docs.pinata.cloud/files/uploading-files.
- Create a free account at pinata.cloud, then open the files page. Free plans can change, so you can check pinata.cloud/pricing.
- Click Add in the top right of the files page. Select your clean photo, give it a name, then upload. If you are asked to choose public or private, choose public, so anyone can see the photo.
- When it is complete, the file is listed on the files page. Copy the CID. That is the long identifier for the file, often starting with bafy or Qm.
- Your account also gets a gateway automatically. Open the Gateways page to see a domain like something.mypinata.cloud. The lasting https link is https://YOUR-GATEWAY.mypinata.cloud/ipfs/YOUR-CID. You can also use ipfs:// followed by the CID.
- Open the https link in a browser and check that your photo appears. Then paste that link (or the ipfs:// link) into the "Or paste a photo link instead" box above, and tap Mint.
Mint and sign in Xaman
When you tap Mint, this page hosts your photo (unless you pasted your own link), mints the NFT on the test network, and offers it to your wallet. Xaman then asks you to sign. Check that the request says XRPL Testnet. If it is a Payment you did not start, or anything you do not understand, tap Reject. Never type a seed into a website.
Check that Xaman says XRPL Testnet and NFTokenAcceptOffer, then accept.
Accept the offer
Nobody can push an NFT into your wallet. You have to accept the offer. If Xaman opens a one-tap accept request, check that it says XRPL Testnet and NFTokenAcceptOffer, then slide to accept.
If you do not see the request, accept it on Bithomp:
Open test.bithomp.com/en/nft-offers/ and add your r address at the end of that link, or paste your address there.
Open the Private incoming tab.
Tap Accept NFT transfer, then sign in Xaman on testnet.
See it on Bithomp
When the offer is accepted, open your NFT on test.bithomp.com (not testnet.bithomp.com). You should see the picture, the name and the NFT ID.
When you have accepted the offer, open your NFT on Bithomp.
Open the NFT page. Tap the button above, or open test.bithomp.com and paste your r address. You see the picture, the name and the NFT ID.
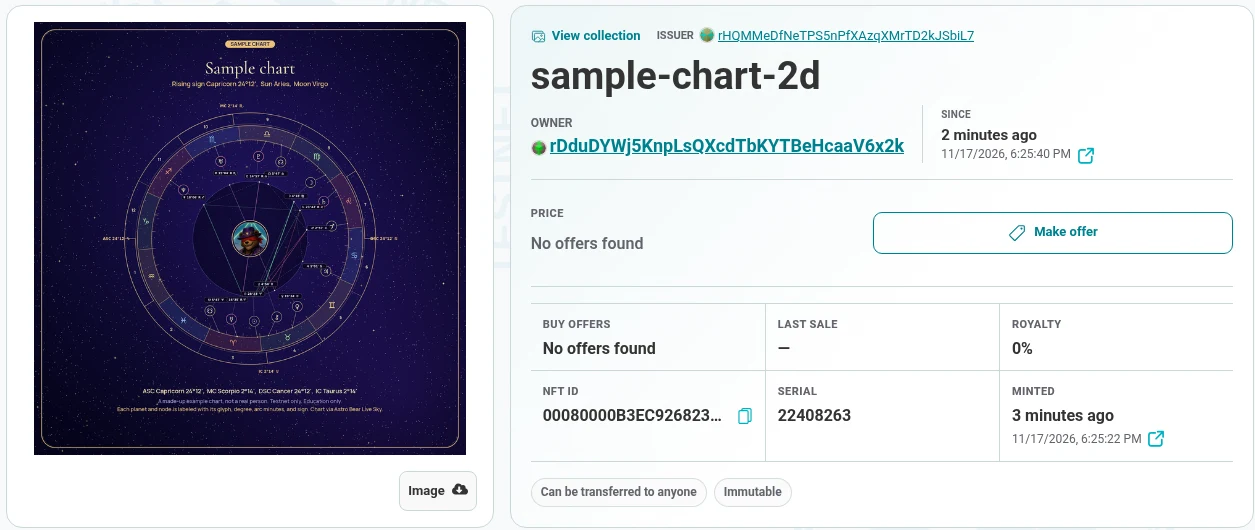
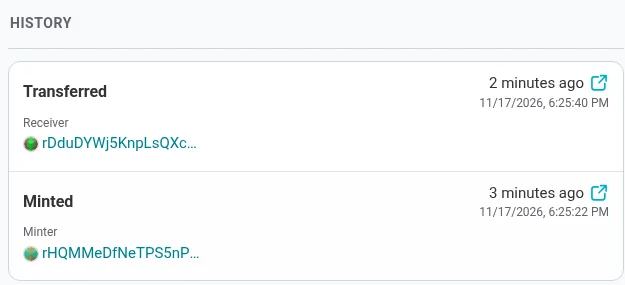
Read the history. Minted shows who made it. Transferred shows who received it after accepting the offer. Each line is a validated transaction anyone can check.
Find the picture link. Under Technical details, URI is the link the NFT points to. The picture lives there, not inside the token.

Bithomp may show a dollar guess and a note about missing metadata. Ignore both for practice: testnet NFTs and test XRP have no value.